On a trip to Michaels I found something really interesting, duct tape sheets of different colors and designs. They also had the rolls of duct tape in the same colors and designs too. I couldn't help but find some reason to buy this stuff. I figured I needed a binder for all of my blog ideas and I could decorate it with my new finds.
The sheets were only $1.99 and they have a grid on the back if you need it. The roll of tape is $4.99. So get creative in your designs and peel n' stick away. You can take a roll of your favorite design to a composition notebook and cover the front and back or cut out designs with the sheets. Super easy and a great way to make a "just because" present for those creative writers we all know.
I do have to apologize that I don't have pictures up but I will edit my post hopefully tomorrow and they will be on here.
Friday, September 30, 2011
Organization/Cleaning/Decorating: Giving a small laundry closet some function
My small laundry closet was not doing anything for me when it came to organizing and storing my toiletries and cleaning products. I needed some sort of way to give everything its own place and a better way for access with such little space. So I came up with a fairly cheap way to do just that.
First, I took inventory of what was in my laundry closet. Then I categorized everything. So I have spare towels, extra toilet paper, extra cleaning products, daily/weekly cleaning products and laundry products. Then I purchased canvas bins with front pocket labels and metal wire baskets to put them all in. I labeled all of the bins and baskets of what I put in each one. That way I know which bin or basket I need and it's easy to pull down.
Of course everyone's laundry room is going to be different but I have found that this was a perfect way to make things work. Plus, it gave a great look to everything. I kept with the same color scheme when I bought the bins and baskets. I think when it comes to organization in tight spaces keeping with the same or similar colors it gives a clean, fresh feeling and catches the eye. Watch Fred Meyers on their sales they usually offer 50% off their baskets and bins. Walmart has a good selection as well.
Saturday, September 24, 2011
Paint/Wood/Metal: Cork board
So I am sure you have all seen the cork boards that have the fabric with the ribbon to hold photos. I have made those before and I love them but I thought of another way to make a cork board just as stylish. You can do this without having to buy fabric which to be frank, can be expensive.
What you need and where to buy it:
1. Cork board- Walmart for $8.96. It's 36" x 24" (huge)
2. Acrylic paint- Michaels for $2.49 *
3. Stencil pattern- Michaels for $4.99 for a pack of 3 with several different patterns
4. Stencil sponge brush- Michaels about $2.99 for a pack of 3
How I did it:
1. I placed my stencil pattern where I liked it best. Mine was the middle so I measured the actual cork board (without the boarder) and determined my middle.
2. Then I taped my pattern to the board. This helps keep it in place so it doesn't move and mess up your design.
3. I took my sponge brush and dabbed it into the paint that I had placed on a paper plate. When you stencil you always want to dabb it onto a practice surface so your brush isn't drenched in paint. This will keep it from leaking under the stencil pattern.
4. Then I dabbed it over the pattern keeping the sponge brush straight up. Once I was done and my pattern was painted I let it dry a little. Then I carefully peeled my pattern off.
*You must use acrylic paint. The cork will absorb other types of paint and it could leak under the stencil pattern. This paint is pretty thick so it is perfect for this project.
The stencil patterns wash clean with warm water and mild soap ,if needed. I bought the plastic kind so I could reuse them for other projects. See my pictures below.
 |
| My supplies. |
 |
| Stenciling my pattern on. |
 |
| My finished product! |
Fashion: Must Have Earrings
This project was just as easy as my fabric headband. I love jewelry and it's definitely an expensive accessory. But I found a way to make cheap, unique earrings.
What you need:
1. Earring pendants with a pre made ring/holes at the top- I bought mine at Michaels. The first pair that you will see were $4.00 but I had a 40% off any one item coupon so I got them even cheaper.
2. Earring hooks- I got these at Michaels as well. You can get a pack of them that have at least 6 pairs for $3.99. Some packages will give you crimping beads or jump rings but with this project you just need the hooks. I paid the same price for a package like that. It never hurts to have those items for later projects.
3. Needle noses pliers- You can buy really any where. Michaels has ones specifically for jewelry for pretty inexpensive. I had some in my husbands toolbox so that saved me.
I took the earring hook and carefully twisted the bottom ring open with my needle nose pliers. Some of the earring hooks have a tiny spring and then a crimping bead. I twisted (or pushed) the spring up the hook slightly along with the bead. You might have to pinch open the bead a little with your pliers. You can usually see the slip in the bead. That made it so I could see the loop to open it. Once I opened the loop I slid it into the pre made loop on the pendant and closed the loop on the hook. I slid the crimp bead and spring back down and pinched the crimp bead to close it. DONE! One package of earring pendants that I bought came with 3 pairs for $4.99 and I had another 40% off coupon on that as well.
Hope you guys try this. It's such an easy way to make a gift or something for yourself. I made these 4 pair of earrings in 10 minutes. That included the time to get my pliers and take my pictures.
What you need:
1. Earring pendants with a pre made ring/holes at the top- I bought mine at Michaels. The first pair that you will see were $4.00 but I had a 40% off any one item coupon so I got them even cheaper.
2. Earring hooks- I got these at Michaels as well. You can get a pack of them that have at least 6 pairs for $3.99. Some packages will give you crimping beads or jump rings but with this project you just need the hooks. I paid the same price for a package like that. It never hurts to have those items for later projects.
3. Needle noses pliers- You can buy really any where. Michaels has ones specifically for jewelry for pretty inexpensive. I had some in my husbands toolbox so that saved me.
I took the earring hook and carefully twisted the bottom ring open with my needle nose pliers. Some of the earring hooks have a tiny spring and then a crimping bead. I twisted (or pushed) the spring up the hook slightly along with the bead. You might have to pinch open the bead a little with your pliers. You can usually see the slip in the bead. That made it so I could see the loop to open it. Once I opened the loop I slid it into the pre made loop on the pendant and closed the loop on the hook. I slid the crimp bead and spring back down and pinched the crimp bead to close it. DONE! One package of earring pendants that I bought came with 3 pairs for $4.99 and I had another 40% off coupon on that as well.
 |
| My first pair. I removed the ring and added my hook. |
 |
| See the pre made holes at the top? This made it so fast! |
Tuesday, September 20, 2011
In The Kitchen: Saving Time and Money With Pre marinated Meats
Besides cleaning products the biggest part of my grocery bill is meat. Now that I have the other things down I can give a bigger part of my budget to that. Like I have mentioned before I don't have that much room. I did have an extra fridge out in my garage at one point that held all of the extra meat. However, that didn't work out too well for us when the breaker decided to kick off and we had an entire freezer full of spoiled meat...in the middle of summer. Needless to say that pretty much spoiled (pun intended) it for us. I have come up with a way that I can still use my fridge in my house and make meal prep time even faster.
I first started with buying the big packs of chicken, ground meat, pork chops etc. and dividing them into portions that I would need to make meals. Then I figured I would pre marinate the meat when I packaged them to cut down my prep time later on. When I season my meat I only use spices and dried herbs. I will give you a list of the blends that I use and ideas for some meals. If you're like me and plan meals for the week so I hope this helps.
CHICKEN
Herbs De Provence, Salt and Pepper-I buy this at World Market and I use it for chicken pot pies, chicken noodle soup
Curry powder, Salt and Pepper-Barefoot Contessa has a great recipe for curry chicken with fennel and potatoes.
Fines Herbs, Salt & Pepper- I buy this at World Market and I use this in a standard chicken salad
Chili powder, S & P, Cumin, Garlic powder, Oregano- Fajitas, Southwest chicken salad
BEEF/GROUND BEEF
Steak seasoning- This mix has so many ingredients it's crazy. You can get it in the bulk bins at Winco. I use this to season my steaks or stew meat. In ground meat I use this for burgers.
BBQ Hickory flavor rub- I mix this in ground beef and make BBQ meat loaf out of it.
Even if you just portion your meat out it will save you time. If you have pre marinated the meat, as it thaws it will flavor it. Simple, right? Use this concept with your families favorite meals. Just remember to use freezer bags or vacuum seal the meat so you can prevent freezer burn. I always label and date my packages then that way as my freezer gets built up I can rotate it. Just make sure all your meat is fresh and you don't let it set out and spoil. Package the meat as soon as you get home from the store.
Sunday, September 18, 2011
Frugal Tip of the Month: Stock your Pantry
One thing I have started doing this year is stocking up on the items for my pantry. With great sales and coupons it's helped me out. Of course everyone's pantry is different and you want to keep that in mind. I wasn't always a fan of this concept and I will tell you why. Number one, our household is not that big at all so I didn't think that we really needed to keep a lot of stuff. Number two, I don't have an actual "pantry" in my kitchen so I thought it would be inconvenient for me to have it anywhere else. Number three, we don't buy a lot of boxed or canned food. My thought was that's what we had to have in our pantry. Yes, I know I was very wrong on all three counts. So this is a small guide or ideas that I hope will help those of you that are wanting to stock up, use those darn coupons or take advantage of great sales. This is what happened:
1. I had an "awe ha" moment. I realized that my pantry didn't have to have all the things that "everyone" should have. What I mean by this is look at what you go through more often than other things. Also take notice of when you use it. Do you bake more in the winter time or do you bake all the time? Don't stock up on things that you won't use. For instance, we eat more soup and bake more in the winter months. So right before Fall I start to watch when things go on sale and look for coupons for those particular things. I know that canned food doesn't go bad for a long time. However, if I keep this method I can stock up on other things that I go through more often during other seasons.
2. I came to terms with the pantry not being in my kitchen. Once I was able to get past my weirdness about this I bought a pantry unit and put it out in my garage. Not only does this help me keep stocked up but also keep my garage clean. Sounds odd but it's true.
3. Your pantry can and should have items that are not food. I don't know if it was just me but when I thought of a pantry I didn't think of toilet paper and cleaning products. I just felt like there was some "rule" that was out there that said there could only be food in my pantry. After a grocery trip that ended in a bill over $100 in just cleaning and non-food items I swore I wasn't going to do that again. Stock up on toilet paper and cleaning products that you use all the time. You can take advantage of sales that will help you get ahead. Last week I bought a 30 pack of toilet paper for $15.99 at Target and it was the brand that I always buy.
4. Price watching and coupon cutting is a Sunday morning routine now. Now that we determined to stock up on what we use I don't spend time cutting out coupons that I will have until they expire or buy something just because we have a coupon. I keep a "cheat sheet" in my purse of the items we use the most. Anything from cereal to dollars per pound on meat this helps me get to know my stores typical price ranges. That way when I am at my main grocery shopping store and I have seen in an ad ,or have a coupon for something, I know where my best deal is. Get to know your needs and your stores. For coupon expertise visit www.thekrazycouponlady.com.
With that all said I have to tell you that this is what has helped me. Everyone is different especially if you have a bigger family, a bigger house and or a bigger budget. These things have just helped me and I think that no matter if you like to have a garage size pantry or a coat closet size this will help.
Sunday, September 11, 2011
Photo Challenge Blog: Ground Shot
I know I know it hasn't even been a week since my last photo challenge blog post. However, the ground shot that I took is very appropriate for today's date. My husband and I were turning onto the highway which is next to a field owned by a local rancher. The rancher put up a tribute for 9-11 and I couldn't pass up the opportunity to capture such honor. We may not all agree why we are at war sometimes but I think we could all agree that for those who fight for us and protect us they deserve to be honored and remembered.
 |
| For those who serve our country and communities. |
Thread, Needle and Fabric: Kleenex pouches
I am not the best seamstress in the world. Honestly, I was never really shown how to hem let alone make anything that would be useful until I met Martha. I must say through the years I have self taught myself a lot of things; how to cook, how to sew and how to do my hair (but really that's not the best). So needless to say I like things easy when it comes to sewing projects and felt fabric makes the process smoother. The fabric is cheap! I only paid .99 at the most for a standard paper size and that was a textured piece. It made it nice knowing that if the project didn't come out right I didn't pay an arm and a leg for fabric. With the cold and flu season upon us I thought that this would be an appropriate project.
The kleenex pouch project I got on Martha Stewart's web site. I did go on to make my own design of little pouches with buttons. My finished products and instructions are below.
What you will need:
1. Felt fabric any color you wish
2. Embroidery thread- you can match to your fabric or use a contrasting color
3. Embroidery needle
4. Buttons
How to make the kleenex holder
1. Cut felt into a 6 3/4 inch wide by 6 1/4 inch long piece
2. Fold each side of the piece in towards the center and overlap by 1/4 inch.
3. Pin along the sides to secure the folds leaving enough room to make your stitch
4. Using your embroidery thread and needle make a simple stitch 1/4 inch from the edge
5. Place tissue in pouch and viola! You have a decorative tissue holder.

How to make the green pouch:
1. Measure and cut the following pieces out of 1 piece of felt fabric:
Front and back- 6 inch by 4 3/4 inch (2 pieces)
Sides- 2 inch by 6 inch (2 pieces)
Bottom- 2 inch by 4 3/4 inch
Flap- 4 3/4 inch by 3 inch- you can use a different color of felt if you like
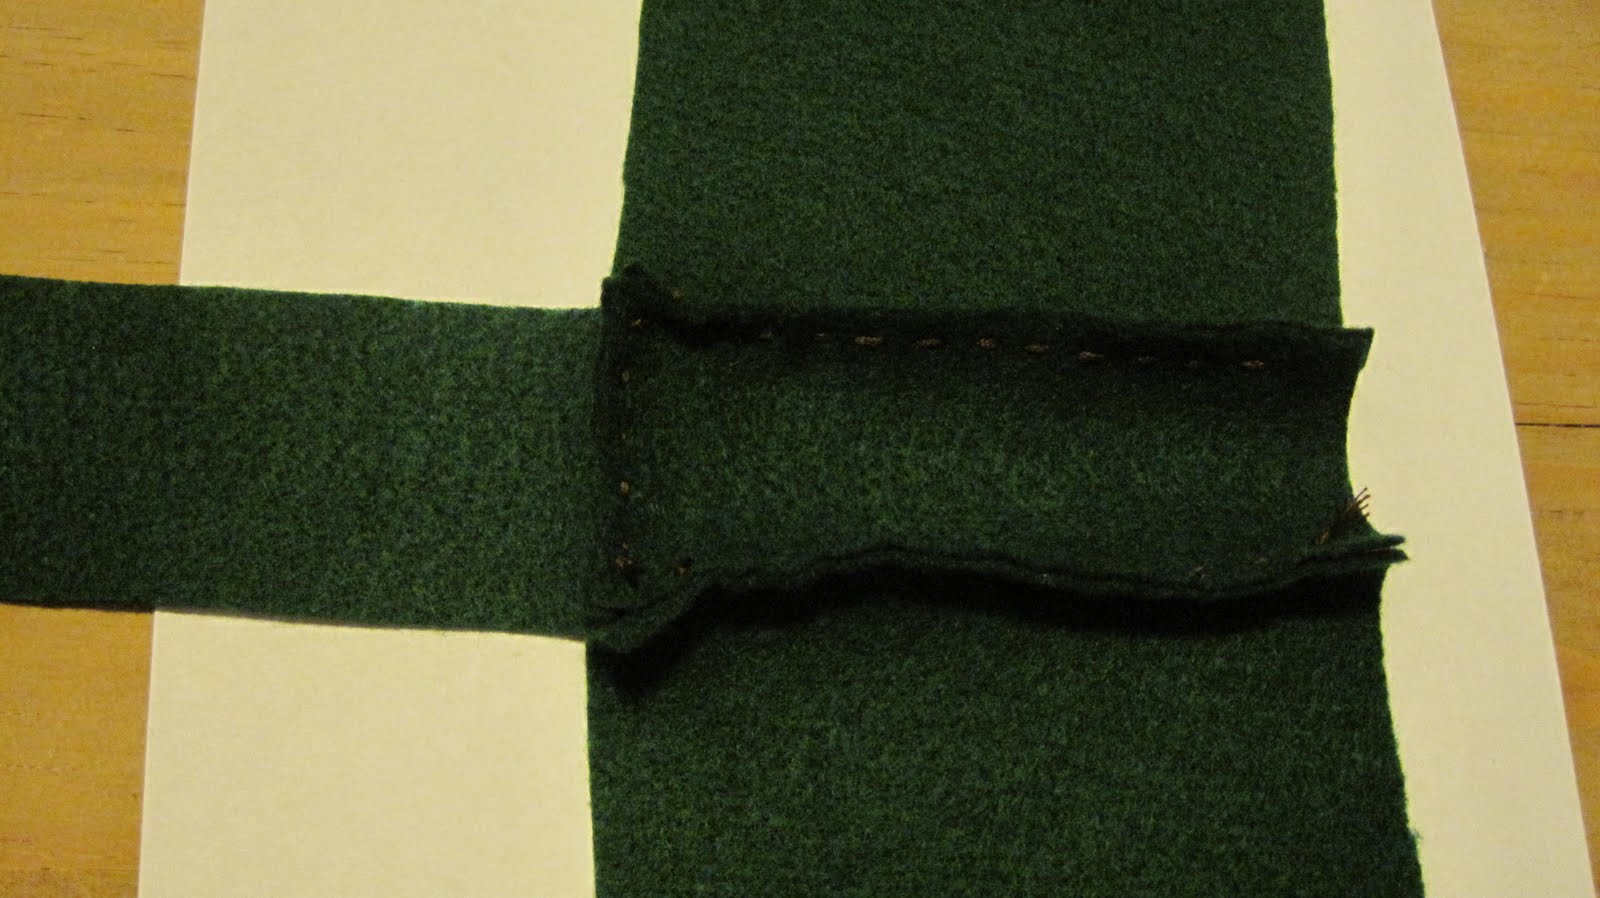
2. Pin and sew the flap to the back piece. I brought mine down about 1 inch and made my stitch 1/4 inch from the top edge.
3. Pin and sew back to bottom piece. I made my stitch a 1/4 inch from the edge and left a 1/4 inch space on each side. (See pictures below)
4. Pin and sew side pieces to the bottom piece. Then sew to the front and back pieces. I started at the bottom of the pouch with my stitch. I pinched the bottom, front and back pieces when I began my stitch for the sides, that way the pouch was secure in the corners.
5. Fold your flap down and determine where you need to place your button. Sew on button and then make your snip on the flap for your button. Now you have made yourself a simple little pouch.
How to make the pink pouch (simpler design):
1. Cut a piece of felt fabric into a 4 inch by 8 1/4 inch piece for the pouch
2. Cut a piece of felt fabric into a 2 1/4 inch by 4 inch piece for the flap
3. Place the flap on the "back" side of the pouch down 1/2 an inch and make your stitch
4. Fold the pouch piece in half so that the bottom of your pouch is a "no sew" edge
5. Pin and sew sides
6. Fold the flap down and determine where you need to place your button. Sew on button and make snip in flap for the button.
The kleenex pouch project I got on Martha Stewart's web site. I did go on to make my own design of little pouches with buttons. My finished products and instructions are below.
 |
| Two different designs |
 |
| Textured Felt kleenex holder |
 |
| Personalized embroidered initials |
1. Felt fabric any color you wish
2. Embroidery thread- you can match to your fabric or use a contrasting color
3. Embroidery needle
4. Buttons
How to make the kleenex holder
1. Cut felt into a 6 3/4 inch wide by 6 1/4 inch long piece
2. Fold each side of the piece in towards the center and overlap by 1/4 inch.
3. Pin along the sides to secure the folds leaving enough room to make your stitch
4. Using your embroidery thread and needle make a simple stitch 1/4 inch from the edge
5. Place tissue in pouch and viola! You have a decorative tissue holder.
 |
| Step #1 |
 |
| Step #2 |

How to make the green pouch:
1. Measure and cut the following pieces out of 1 piece of felt fabric:
Front and back- 6 inch by 4 3/4 inch (2 pieces)
Sides- 2 inch by 6 inch (2 pieces)
Bottom- 2 inch by 4 3/4 inch
Flap- 4 3/4 inch by 3 inch- you can use a different color of felt if you like
2. Pin and sew the flap to the back piece. I brought mine down about 1 inch and made my stitch 1/4 inch from the top edge.
3. Pin and sew back to bottom piece. I made my stitch a 1/4 inch from the edge and left a 1/4 inch space on each side. (See pictures below)
4. Pin and sew side pieces to the bottom piece. Then sew to the front and back pieces. I started at the bottom of the pouch with my stitch. I pinched the bottom, front and back pieces when I began my stitch for the sides, that way the pouch was secure in the corners.
5. Fold your flap down and determine where you need to place your button. Sew on button and then make your snip on the flap for your button. Now you have made yourself a simple little pouch.
 |
| Step #1 (this is without the flap piece) |
 |
| Step #3-I am pointing to the 1/4 space I left. |
 |
| Step #4 |
 |
| All the pieces sewn together |
 |
| Step #4. Pinching all 3 pieces at bottom corner. |
How to make the pink pouch (simpler design):
1. Cut a piece of felt fabric into a 4 inch by 8 1/4 inch piece for the pouch
2. Cut a piece of felt fabric into a 2 1/4 inch by 4 inch piece for the flap
3. Place the flap on the "back" side of the pouch down 1/2 an inch and make your stitch
4. Fold the pouch piece in half so that the bottom of your pouch is a "no sew" edge
5. Pin and sew sides
6. Fold the flap down and determine where you need to place your button. Sew on button and make snip in flap for the button.
Wednesday, September 7, 2011
Photo Challenge: Recent Event
My recent event photo is of the Boise Balloon Classic Night Glow. We had so much fun. The weather was perfect, not too many people were there and we had a great view.


Yes, I Like to Stay Busy
On top of my monthly creative challenges I have decided to take on another challenge. I know crazy, right? My friend Amanda has created a photo challenge blog. Because I am doing so much I am only going to do 8 photos from her challenge but they will be posted every week for the next 8 weeks. I do love taking pictures and this only gives me a reason to start snapping away. Here are the subjects I will be taking pictures of:
1. Recent event
2. Landscape photo
3. Historic Landmark in my city
4. My pets
5. Photo from ground level
6. Funny photo
7. Flowers or plants
8. Favorite activity
1. Recent event
2. Landscape photo
3. Historic Landmark in my city
4. My pets
5. Photo from ground level
6. Funny photo
7. Flowers or plants
8. Favorite activity
Tuesday, September 6, 2011
Amanda's Photo Blogging Challenge
Okay, so I finally got my challenge organized. Before I list the rules and the challenges, I want to tell you why I decided to create this challenge.
I have two goals in mind that I hope will be accomplished with this. The first is to make blogging a habit. It takes an average of sixty days to form a habit, hence the twelve week minimum you will see in the rules. The second is to enhance the blog with photos. Pictures help keep an audience engaged. They help them to understand what words alone may not convey. As they say, a picture is worth a thousand words.
Okay, so here are the rules and the challenges:
Photo/Blogging Challenge Rules:
Copy and paste the rules and challenge list to your blog so your readers know what you're doing and can participate themselves if they would like to. It might be useful to paste a copy into Word or other program so you can print a copy of the challenge list. You can then simply cross off the ones you've done, maybe highlight the ones you want to do, etc.
I have two goals in mind that I hope will be accomplished with this. The first is to make blogging a habit. It takes an average of sixty days to form a habit, hence the twelve week minimum you will see in the rules. The second is to enhance the blog with photos. Pictures help keep an audience engaged. They help them to understand what words alone may not convey. As they say, a picture is worth a thousand words.
Okay, so here are the rules and the challenges:
Photo/Blogging Challenge Rules:
- One challenge must be completed each week. There is a twelve week minimum, but you may do any number of weeks from twelve to thirty.
- Every post for the challenge must have at least one photo
- Photos should either have you in them or been taken by you whenever possible
- You don't have to do the challenges in order. Fit them to your needs, but no repeating a challenge twice.
- When starting the challenge, do a quick post telling what you hope to accomplish through this and tell your readers how many weeks you're challenging yourself to do.
- Photos of your pets. This can be current or past pets.
- Photos from a recent vacation. Did you have fun? Where did you go? What did you do?
- Progressive photos of a project you're working on.
- The view from your back door.
- Favorite object in your house. What do you love about it?
- Favorite landscape photo.
- A recent event you attended.
- A photo of yourself engaging in a favorite activity.
- What do you do when you're bored? Don't forget the photo!
- A photo of you (and friends if needed) posing as a scene from your favorite T.V. show. See if your readers can guess the show!
- A historic landmark in your area.
- Take a photo from ground/floor level. Yes, you have to get down on the ground/floor to get this shot. Lay on your back and take an angled photo looking up, or lay on your stomach and get a shot from your pet/infants point of view.
- Take a photo of a wild animal, and yes, squirrels and birds count as "wild" animals. =)
- What was your favorite game as a kid? Post a picture of you playing it now.
- Before and after photos. This can be of a project, you, anything you can think of.
- A funny photo. Why does it make you laugh?
- A baby photo of you along with a recent photo.
- A photo of a flower or plant.
- Share three images and ask your readers to guess what they have in common.
- Your home.
- Favorite outfit. What's your style about?
- Take a photo of the front of your fridge. What's your magnet style? Orderly, disorderly, or no magnets at all?
- A picture of the book you're currently reading. Give a quick review.
- Your favorite piece of jewelry or accessory.
- Something you've made.
- Do you have a collection? Show us what you collect.
- Favorite souvenir and where it is from.
- A talent you have. Again, don't forget the photo!
- What gizmo, gadget, or device would you hate to live without?
- An interesting building in your area. Why do you like it?
Copy and paste the rules and challenge list to your blog so your readers know what you're doing and can participate themselves if they would like to. It might be useful to paste a copy into Word or other program so you can print a copy of the challenge list. You can then simply cross off the ones you've done, maybe highlight the ones you want to do, etc.
Monday, September 5, 2011
In the Kitchen: Another Great Idea for Fresh Market Finds and Saving Time
Fajitas are very popular in our house but I hate taking 20 minutes to cut everything up. A great way to save time is to do it ahead of schedule. If you see a great deal on bell peppers (especially during the winter months) take advantage of it. Cut the peppers into strips along with onion and place into freezer bags. Label them and put them in the freezer. You could also do this with your meat. I would recommend to place the meat and vegetables in their own bags to avoid cross contamination. Now that it's all done ahead of time the only thing you have to do is cook your meat and vegetables.
In The Kitchen: Corn on the Cob
Farmer's markets and local produce stores are a great way to find deals on produce. Not to mention the fact that it's a huge way to support your local farmers and boost the economy. Sometimes you find such great deals that when you get home you find that you are not sure what to do with them. Well I have solved the problem at hand. I recently bought a dozen ears of corn for $3.50 from Simpons Farms and this is what I did with it.
What you need:
1 dozen ears of corn
Gallon freezer bags
1-10 lb bag of ice
Steps of Getting Setup:
1. Remove husks from the cobs and rinse.
2. Fill your stockpot 3/4 full of water.
3. Fill a large bowl full of ice water. I bought a bag of ice so I knew that I would have enough to blanch the corn.
4. Place a kitchen towel next to the bowl of ice water for a "drying station"
5. Label 3 One gallon freezer bags with date. I also put on my label where I bought the corn so I knew next year where to buy it.
The process:
1. Bring water to a boil in your stock pot. Place 4 ears of corn in boiling water using tongs (so you don't burn your fingers. Boil the corn for only 5 minutes. Because you are freezing these and you will be reheating them. You don't want to over cook the corn and make it too soft.
2. Once the corn is cooked, using your tongs, remove the corn and place them in the ice water. This process is called blanching and it stops the cooking. Let them sit in the ice bath for about 3 minutes. While your batch of corn is bathing place your next batch of uncooked corn into the boiling water.
3. Remove them from the ice bath and pat dry. Place in labeled freezer bags and put in freezer to enjoy later.

You can portion these out any way you like. I did four in each bag because I would normally cook that amount for dinner so we have some for lunch the next day. You can even cut them in half for kids size or picnics. When it's time for you to cook them pop them in the microwave for about 1-1 1/2 minutes (depending upon desired temperature). If you don't have a microwave like myself, place them in boiling water for a few minutes until corn is heated thru.
What you need:
1 dozen ears of corn
Gallon freezer bags
1-10 lb bag of ice
Steps of Getting Setup:
1. Remove husks from the cobs and rinse.
2. Fill your stockpot 3/4 full of water.
3. Fill a large bowl full of ice water. I bought a bag of ice so I knew that I would have enough to blanch the corn.
4. Place a kitchen towel next to the bowl of ice water for a "drying station"
5. Label 3 One gallon freezer bags with date. I also put on my label where I bought the corn so I knew next year where to buy it.
The process:
1. Bring water to a boil in your stock pot. Place 4 ears of corn in boiling water using tongs (so you don't burn your fingers. Boil the corn for only 5 minutes. Because you are freezing these and you will be reheating them. You don't want to over cook the corn and make it too soft.
 |
| My corn all ready to go next to my stockpot! |
 |
| Boiling away! |
3. Remove them from the ice bath and pat dry. Place in labeled freezer bags and put in freezer to enjoy later.
 |
| In the ice bath. |

You can portion these out any way you like. I did four in each bag because I would normally cook that amount for dinner so we have some for lunch the next day. You can even cut them in half for kids size or picnics. When it's time for you to cook them pop them in the microwave for about 1-1 1/2 minutes (depending upon desired temperature). If you don't have a microwave like myself, place them in boiling water for a few minutes until corn is heated thru.
Sunday, September 4, 2011
September's Creative Challenges
Ok, my last two posts were suppose to be in August. Sorry that I fell behind but I'm up to par and on the ball for September. This month I will have much more posts. I will have more than one project for some categories. So here they are and I hope that you look forward to them.
In the Kitchen: Freezer friendly and time saving ideas. What to do with your farmer's market finds
and how to pre-marinate meats.
Organization/Cleaning/Decorating: Give a small laundry closet a new and organized look.
Paper and Glue: Decorative Duct Tape notebook
Thread/Needle/Fabric: Felt tissue holder, Plastic bag holder
Paint/Wood/Metal: Cork board
Fashion: Must have earrings
Fashion: Headband with Fabric Flower


This is how easy it was. I took the fabric flower, hot glued it to my headband and then let it dry. Seriously I wish I would have found these a lot sooner.
Paper and Glue: Letter box logbook
Recently we took up a fun new hobby called letter boxing thanks to our friends Amanda and Carma. It's a great hobby to get you outdoors and using your brain. To best explain it you need to check out the web site www.atlasquest.com and it will give you full details and the history behind it. One of the things that you need to have on your journey of letter boxing is a logbook to keep track of your finds. When I decided to get going on this new hobby I wanted to make a letter box logbook unique and it gave me a good reason to mod podge something. You can create any type of notebook that you want.
What you need:
Cardstock with any type of design you wish
Glue stick
Mod Podge-gloss luster finish
Notebook
Sponge paint brush
 1. I took my paper I wanted for my background, typed up a title for my notebook and glued them to the front of my notebook. (By the way this project gave me more ideas for other notebook projects that I will feature in the next couple of months.)
 2. After the glue dried I then applied the mod podge to the front of the notebook. The mod podge looks like Elmers glue. Don't worry that it looks "foggy" it will dry glossy and clear. Just brush it on and let it dry. See my finished product above.
What you need:
Cardstock with any type of design you wish
Glue stick
Mod Podge-gloss luster finish
Notebook
Sponge paint brush


Subscribe to:
Posts (Atom)