Tuesday, February 28, 2012
Sunday, February 26, 2012
Thursday, February 23, 2012
My Chapstick has a Name
One of my must haves in my purse is chapstick. If I am not in need of it my husband is. For this last Halloween my friend Carma Farrar (aka crazy mountain woman) gave me a chapstick she recovered with a Halloween scene. She got the printable off www.mycomputerismycanvas.com. The other night I was thinking that I needed to put a chapstick in my new stand in my bathroom. However, I wanted it to match the colors in my bathroom (I know crazy). So I thought back to that chapstick and grabbed my mod podge, some scrapbook paper that matched and tah dah! I went on to make other cute covers and let me tell you it's super easy. This will make you want to buy a Costco pack of chapstick just so you can cover them.
What you need:
1. Chapstick
2. Paper of whatever color/design
3. Ribbon-if you want
4. Mod Podge
5. Ruler, Pencil and scissors
How to:
1. Peel off the original cover of the chapstick
2. Measure a 1 3/4 inch by 2 inch piece of paper (this should be your standard size)
3. After you cut your piece of paper wrap it around a pencil to curl the paper
4. Paint a thin layer of mod podge on the back side of the paper
5. Wrap the paper around the chapstick (glue side against the chapstick)
6. Once you get the paper on the chapstick spread a thin layer over the outside
7. Tah Dah! You have got a fancy chapstick.
If you want to add ribbon just follow the same process as you did with the paper. Thanks to my friend Carma my chapsticks have names.
 |
| Curling the paper |
 |
| My chapstick to go in my bathroom |
 |
| Animal print chapstick covers |
Monday, February 20, 2012
Key Chains
When I am at Michaels I tend to get myself into some trouble. I wasn't even looking for things to make key chains but I found them anyways. So I had to buy them, and I made a couple of them (one is for the giveaway in March).
To make things easier I used my jewelry tool kit so I could get the links opened and closed. I didn't have a method to my creativity.
Few things you might want:
1. Jewelry pliers
2. Chain with clasps
3. Charms & beads
4. Links & eyelets
Really easy, a great way to make a gift for someone and personalize it!
My inspiration came from a key chain that my husband gave me for Christmas that was in my stocking. Now my Team Edward key chain has some extra charms.
To make things easier I used my jewelry tool kit so I could get the links opened and closed. I didn't have a method to my creativity.
Few things you might want:
1. Jewelry pliers
2. Chain with clasps
3. Charms & beads
4. Links & eyelets
Really easy, a great way to make a gift for someone and personalize it!
 |
| Clasps and Chains |
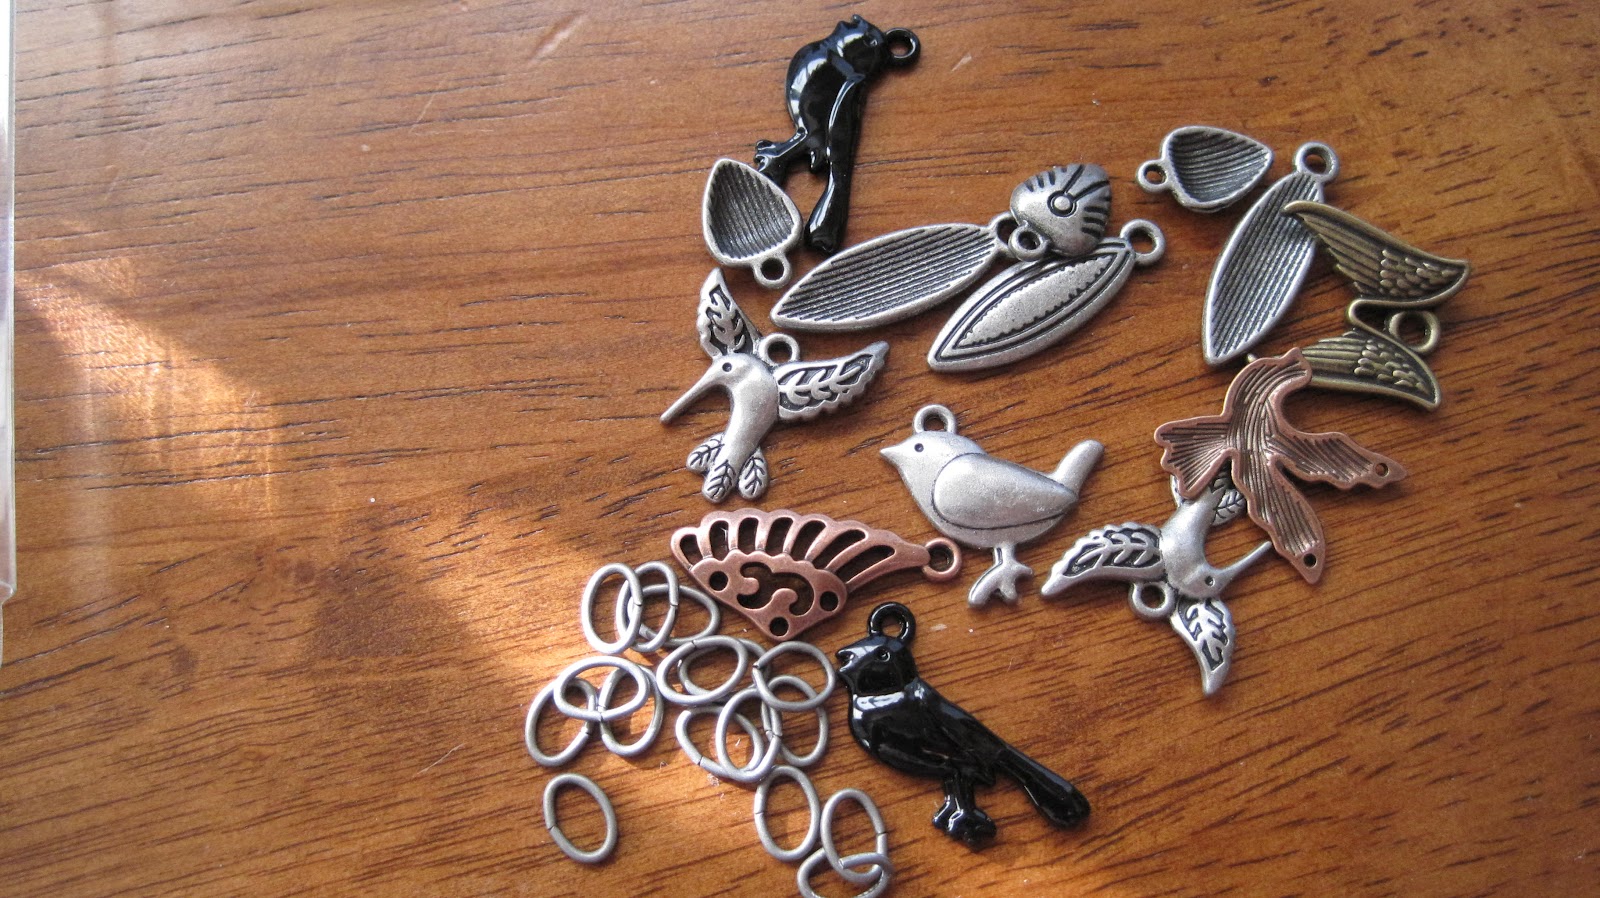 |
| My charms and links so I could add them to the chain |
 |
| My jewelry pliers that I used |
 |
| My finished key chain |
Nice Girls Wear Pink on Tuesdays
Lists are one my favorite things to write. On top of lists I love making a wardrobe plan for the week. Yes, I am crazy. When you are in a hurry it is a time saver. Try it once and tell me I am wrong.
Every Sunday I sit down (usually in my closet) and put together my outfits. I base it on weather, new items of clothing or accessories I want to wear, holidays (the list goes on). I remembered one thing when I was doing this the other day. In the movie Mean Girls, Wednesday was the day the mean girls wore pink. Well, that was a damper because I love pink. So I have decided to make Tuesday my pink day and I am a nice girl. So here is my out fit for tomorrow.

Every Sunday I sit down (usually in my closet) and put together my outfits. I base it on weather, new items of clothing or accessories I want to wear, holidays (the list goes on). I remembered one thing when I was doing this the other day. In the movie Mean Girls, Wednesday was the day the mean girls wore pink. Well, that was a damper because I love pink. So I have decided to make Tuesday my pink day and I am a nice girl. So here is my out fit for tomorrow.

Saturday, February 18, 2012
Finally a Reason for a Rubber Ducky!
On Pinterest I saw this post of a homemade cake stand made out of a plate glued to a candle stick. So I was thinking how cute it would be to put in a bathroom. However, my counter space isn't very big and I wanted my stand to look a little different. Now you must know one thing about me. When I see or think of a project I always have to have a purpose for it. I store things in the back of my mind like, I've always wanted a reason to buy rubber duckies for each holiday. At World Market they always have such cute ones and I never have had the right spot for them. And, come on, you want to show them off. Well now I can.

Instead of using a small plate on the top I used a bowl. Yes my rubber ducky is an Easter one but trust me a I have a dressed down Plain Jane one. I just wanted you to get the full affect. I bought some soaps and a natural sponge too. Now I have a place to put all the fun little things, oh and a reason to make a project.
All you need is two plates (or a bowl for the top) and some silicone household glue that will adhere to glass and ceramic. I found mine at Home Depot for $4.99. My plate and bowl were each $3.99. I already had the glue so my project only cost me $8.00. If you included all the rubber duckies and soaps it would seem a little pricey but it makes for great, decorative storage.

Instead of using a small plate on the top I used a bowl. Yes my rubber ducky is an Easter one but trust me a I have a dressed down Plain Jane one. I just wanted you to get the full affect. I bought some soaps and a natural sponge too. Now I have a place to put all the fun little things, oh and a reason to make a project.
 |
| This is all you need. |
 |
| Glue on the bottom rim of the candle stick. |
 |
| My project complete in 2 minutes! |
All you need is two plates (or a bowl for the top) and some silicone household glue that will adhere to glass and ceramic. I found mine at Home Depot for $4.99. My plate and bowl were each $3.99. I already had the glue so my project only cost me $8.00. If you included all the rubber duckies and soaps it would seem a little pricey but it makes for great, decorative storage.
March Contest Giveaway
For the month of March I will be doing a giveaway basket. It will feature some of my favorite products as well as some things that I have made on my blog. I just want to share all the wonderful and fun things that I come across with you guys. There are a few rules to qualify for the drawing but nothing complicated. I will literally be pulling a name from a hat...or a jar, but it will be random. I will announce the lucky winner March 25th and then give my email address and make arrangements to send or drop off the basket of goodies!
Rules:
1. You must be a subscriber/follower to my blog
2. You must be signed up by March 24, 2012
3. You can only enter (subscribe) once
I just want to thank everyone ahead of time for signing up. Please feel free to comment below if you have any questions or suggestions either for the drawing or projects you would like to see me do. I can't wait to do the drawing. I will have the basket done by March 15th so you can see what is in it (I will be posting a picture). Good luck.
Monday, February 13, 2012
Valentine's Day Creations
My first Pinterest project and what a perfect one to give for Valentine's Day for my office friends. While I had the mod podge out I made a Valentine's Day box for my niece. Just slap on some mod podge onto thick cardboard then cut your scrapbook paper to what size you need then a thin layer of mod podge over that. I made a mini legal pad size clip board just like the sticky note pad ones. The binder clips I decorated with gems. Of course I used my trusty Gem Tack glue to stick those on. I hope you guys like them and try it.


For the sticky note clipboards I cut the cardboard and paper to a 4x4 inch square. I made all of these in about an hour from the time I cut, glued and mod podged everything.
 |
| Binder Clip with a gem. |
 |
| My variety of sticky note clipboards |


For the sticky note clipboards I cut the cardboard and paper to a 4x4 inch square. I made all of these in about an hour from the time I cut, glued and mod podged everything.
Sunday, February 12, 2012
Tuesday, February 7, 2012
Valentine's Day Cards
Happy Valentine's Day! Okay, in a week but I wanted to share my cards I made. They are super easy and really you can make them any way you feel.
 |
| Front of the card |
 |
| Inside of the card |
Sunday, February 5, 2012
Organizing My Closet
Where to start? That is always the hardest part to figure out before beginning a reorganization project. I took this challenge on with my master closet. So I will tell you (along with pictures) what I did.
First I made a list of the things I hated the most about my closet. Things I knew I could fix on a small budget. I gave myself a limit of 5 things. Why you ask? If you don't have a huge budget or a lot of time you don't want to overwhelm yourself because once you feel that you will quit. Am I right? Here are my 5 things.
5 Things I Hated:
1. Closet door- When they built the house they didn't put the kind of door that slides into the wall so when I opened the door it cut off access to half of my closet.
2. No color- I know weird. Why would I want color? Well I love giving every room, nook and cranny in my house character.
3. The floor- Trapped cat and carpet floors don't go too well together. I don't think I need to say much else.
4. Access & stuffed of baskets/totes- My baskets were not being utilized well and I needed drawers to put everyday things in.
5. Lighting- I like to see my clothes. My light fixture had a frosted glass and old energy sucking bulbs.
Okay, so now how did I fix all those things? One at a time, shopped clearance and made exceptions.
Here are pictures of before.
How I fixed my problems:
1. I took my door off and put up a curtain. For now I am fine with that. However, I will be getting a kit to put in the sliding door. I just needed to make the ability to access the other half of my closet on a budget. Target had curtains on clearance as well as rods. For under $20 I fixed my problem.
2. Paint is cheap enough to make a dramatic change. But what would you paint in a closet? I painted my shelves and I added little things like a picture frame and labels on my drawers to my makeup and hair organizers. I used the Behr Paint and Primer in a sage green. $15 for a quart.
3. The floor is what cost us the most. My closet is about a 30 sq. ft. space so it wasn't horrible. We went with a peel and stick tile. Because we have an access door in there I didn't want to make it too heavy with real tile nor did I want to put that much money into a non-living space.
4. I went through clothes and got rid of whatever I didn't wear in the last year (because it's winter I didn't go with the 6 months rule). I figured if I didn't wear it last summer or this winter it's being donated. Then I figured out all the baskets and totes I had and put them into better use. I ended up buying a large 3 drawer organizer to put clothes in. It's on wheels too so that makes it easy to move. $23 at Target.
5. For $10 I found an open faced light fixture and put in an energy saving bulb that gave out more light (I didn't exceed what they recommended for wattage) but used less wattage.
I took my time. Even though I am a person that starts a project and will have to end it the same day (or weekend) I knew this would take awhile.
My all together cost was about $150. Between a new floor, light fixture, drawer organizer and curtain I would say that was pretty good. Really if my carpet wasn't ripped at the door I would have thrown a rug down and saved even more.
Here's my after pictures:
The quote says, "Happiness is the secret to all beauty; there is no beauty that is attractive without happiness." Christian Dior.
My "bloopers" or insightful photos to the project:
Remember that home improvement projects will bring out every emotion in you. Be prepared to learn from it. My husband and I have done just about every remodeling project you could think of and it's amazing how much you learn from each other. I didn't break a nail (I swear) and I love my husband for going along with my crazy ideas.
I will be posting a video tour of my closet so you get a better idea of how it's all set up. I hope you guys like this and if you have any questions please ask away. I didn't post the steps to re-flooring only to make this not drag out but I would be more than happy to take you through it. Happy reorganizing!
First I made a list of the things I hated the most about my closet. Things I knew I could fix on a small budget. I gave myself a limit of 5 things. Why you ask? If you don't have a huge budget or a lot of time you don't want to overwhelm yourself because once you feel that you will quit. Am I right? Here are my 5 things.
5 Things I Hated:
1. Closet door- When they built the house they didn't put the kind of door that slides into the wall so when I opened the door it cut off access to half of my closet.
2. No color- I know weird. Why would I want color? Well I love giving every room, nook and cranny in my house character.
3. The floor- Trapped cat and carpet floors don't go too well together. I don't think I need to say much else.
4. Access & stuffed of baskets/totes- My baskets were not being utilized well and I needed drawers to put everyday things in.
5. Lighting- I like to see my clothes. My light fixture had a frosted glass and old energy sucking bulbs.
Okay, so now how did I fix all those things? One at a time, shopped clearance and made exceptions.
Here are pictures of before.
 |
| The door |
 |
| Some things didn't really have a place |
 |
| The horrible floor. |
1. I took my door off and put up a curtain. For now I am fine with that. However, I will be getting a kit to put in the sliding door. I just needed to make the ability to access the other half of my closet on a budget. Target had curtains on clearance as well as rods. For under $20 I fixed my problem.
2. Paint is cheap enough to make a dramatic change. But what would you paint in a closet? I painted my shelves and I added little things like a picture frame and labels on my drawers to my makeup and hair organizers. I used the Behr Paint and Primer in a sage green. $15 for a quart.
3. The floor is what cost us the most. My closet is about a 30 sq. ft. space so it wasn't horrible. We went with a peel and stick tile. Because we have an access door in there I didn't want to make it too heavy with real tile nor did I want to put that much money into a non-living space.
4. I went through clothes and got rid of whatever I didn't wear in the last year (because it's winter I didn't go with the 6 months rule). I figured if I didn't wear it last summer or this winter it's being donated. Then I figured out all the baskets and totes I had and put them into better use. I ended up buying a large 3 drawer organizer to put clothes in. It's on wheels too so that makes it easy to move. $23 at Target.
5. For $10 I found an open faced light fixture and put in an energy saving bulb that gave out more light (I didn't exceed what they recommended for wattage) but used less wattage.
I took my time. Even though I am a person that starts a project and will have to end it the same day (or weekend) I knew this would take awhile.
My all together cost was about $150. Between a new floor, light fixture, drawer organizer and curtain I would say that was pretty good. Really if my carpet wasn't ripped at the door I would have thrown a rug down and saved even more.
Here's my after pictures:
 |
| Pretty floor |
 |
| Color! It makes everything POP! |
 |
| My accents. A quote from Christian Dior and my note pad. |
 |
| Simple but it does the trick |
 |
| Me and The Greatest Husband taking a break |
 |
| My job was to pull out all the staples. |
I will be posting a video tour of my closet so you get a better idea of how it's all set up. I hope you guys like this and if you have any questions please ask away. I didn't post the steps to re-flooring only to make this not drag out but I would be more than happy to take you through it. Happy reorganizing!
Wednesday, February 1, 2012
Makeup Review and Swatches
Maybelline came out with a great product last month. It is the Color Tattoo 24 hour eyeshadow by Eyestudio. It is a cream eyeshadow in a pot. Similar to Mac's paint pots. I have used this product for the last 2-3 weeks and I LOVE them. Trying to not over do it I only bought 3 (at $5.99-$7.99 a piece that can get expensive). Plus I didn't want to have a ton of product and absolutely hate it.
The reasons why I love LOVE this product:
1. They are very well pigmented
2. After you apply the product it feels smooth on your eyelid
3. It actually lasts 24 hours
4. You can apply eyeshadow on top of the product and it brings out the eyeshadow color
5. It also holds eyeshadow well and doesn't crease
I would highly suggest buying this product. If you have oily eyelids (like I do) you won't have a problem with this creasing but you can always use an eye primer to be sure.
Too Cool is a great highlighting color (in the arch of the eyebrow and inner corner of the eye)
Tough as Taupe goes great with purple and tan eyeshadows
Audacious Asphalt is perfect if you want to have a smokey eye look
The reasons why I love LOVE this product:
1. They are very well pigmented
2. After you apply the product it feels smooth on your eyelid
3. It actually lasts 24 hours
4. You can apply eyeshadow on top of the product and it brings out the eyeshadow color
5. It also holds eyeshadow well and doesn't crease
I would highly suggest buying this product. If you have oily eyelids (like I do) you won't have a problem with this creasing but you can always use an eye primer to be sure.
 |
| Too Cool, Tough as Taupe and Audacious Asphalt |
 |
| Swatches of the product |
Tough as Taupe goes great with purple and tan eyeshadows
Audacious Asphalt is perfect if you want to have a smokey eye look
Subscribe to:
Posts (Atom)